

What You Need:
- A Bone Giant boxed set
- A Tomb Scorpion body
- A Screaming Skull Catapult arm
- A Screaming Skull Catapult vulture
- 2 Shields from the Skeleton Warriors Regiment
- 5 Skulls from the Skeleton Warriors Regiment
- 3 Banners from the Skeleton Warriors Regiment
- A fair bit of Green Stuff
Assembling The Body:
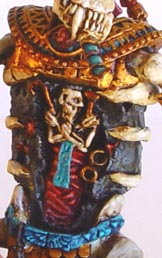
Take the Bone Giant's upper chest, and carefully saw off everything below the first line of square armour plates. Repeat the process with the Tomb Scorpion body, cutting off everything just above the entombed Liche Priest (make sure to leave his crook and flail intact, as this entombed old guy is in fact Sehensmet), leaving a nice flat edge to join on to the Bone Giant body. Also, saw a small amount off the bottom of the Tomb Scorpion body, so that there is about half an inch between where the entombed Liche Priest ends and the bottom of the Tomb Scorpion body.
Now you need to use a file of some kind (a rotary multi-function tool works well) to remove the base of the spinal cord that sticks out of the Bone Giant's pelvic bone so that it will be a smooth fit for the Tomb Scorpion body. Take a file, and score some deep groves into the side of the bottom of the Tomb Scorpion's body, so that it will slot nicely into the pelvic bone of the Bone Giant.
Finally, drill a hole or two (depending on how strong you want the final join to be) all the way through each piece -the Bone Giant's shoulders, the Tomb Scorpion body, and the Bone Giant pelvis. Fit them together before without glue to see how it fits, and make adjustments as necessary. Don't worry about the holes coming out of the Bone Giant's neck and pelvis, as you can fix that up with Green Stuff. Be careful to get the holes to line up right. Then, once you have it all drilled, pin and glue all three pieces together.
Take some Green Stuff, and fill in the gaps on the back of the Tomb Scorpion body (the flat areas where the Tomb Scorpion's legs are meant to go). Now to complete the look of a Liche Priest entombed in a Bone Giant, we need to use Green Stuff to sculpt on a ribcage and spinal cord. Place the ribs so that they cover up the grooves on the Tomb Scorpion's back, and remember to sculpt some rags or banners on there to maintain the ancient, mystic look. Fix up with Green Stuff any gouges you made while drilling the holes for the pins. Alright, that's most of the hard work done.
Assembling The Legs:
Sehenesmet's legs are simply normal Bone Giant legs with Skeleton Warrior shields stuck on. You will need to bend the shields in order to get a good fit. To do this, heat them up, carefully. If you get them too hot they either melt or catch fire. Or both, which is not good. Make sure you have an excess of shields around before doing this, unless you really know what you're doing. After you've bent them, trim the back so they are square-ridged again, as the heat will warp them and make them go shiny and curved, which does not look right. Then glue the shields on to the legs. Voila.
Assembling The Left Arm:
Take the Screaming Skull Catapult arm, and hack off the base of it (the bit where it would join to the rest of the Catapult). Then carefully cut it just after the middle metal band (see picture). Cut both the sword and the pommel off the Bone Giant's left arm, but keep the pommel for later. Drill a hole through the Bone Giant's left fist, and drill holes into both ends of the Screaming Skull Catapult arm. Then pin the whole contraption together, glue it, and let it dry. After its dry, use Green Stuff to fix up any mistakes, and to smooth out any joints. Also use green stuff to sculpt a smooth, rounded end on to the end of the Screaming Skull Catapult arm which you hacked off before, adding some rags and leather bindings to make it look smooth.
Assembling The Right Arm:
Hack the sword blade off the Bone Giant's right arm. Then carefully sever the right arm just after the elbow joint (ie just before the bracelet). Drill a hole in both ends, and glue and pin it back in position with the hand rotated to face more outwards. Fix up any gaps with Green Stuffed-leather bindings. Take the pommel from the Bone Giant's other arm and glue it where the blade used to be on this arm to make a small wand-thing.
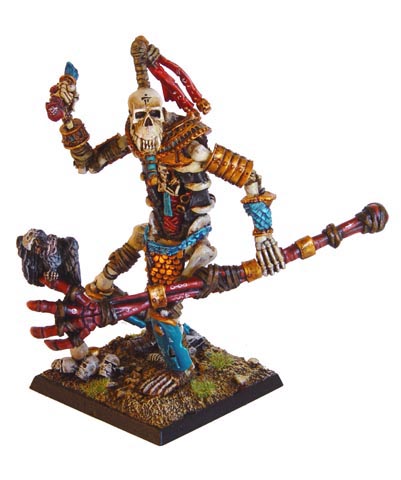
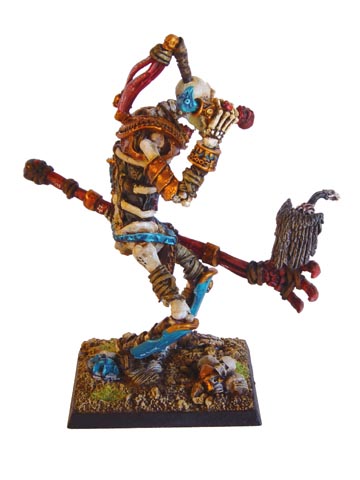
At this point, it helps if you assemble the model first. If you're experienced and skilled, you could pin all the joints together for extra strength. I didn't though, mainly because it looked too hard. Start assembling from the bottom up - scenic base onto plastic base, legs onto scenic base, body onto legs, and so on. Position the arms as you like. My left arm is in this position because it allows me to glue it onto both the shoulder joint and the part of the leg that is is resting on, for extra strength. Then we'll move onto the head.
Assembling The Head:
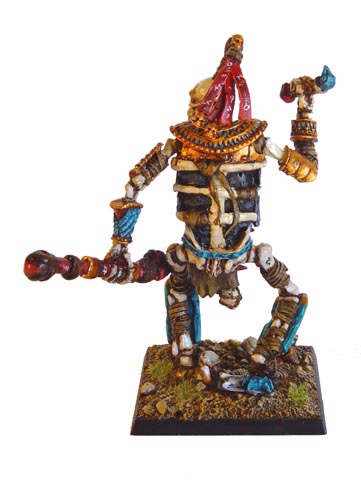
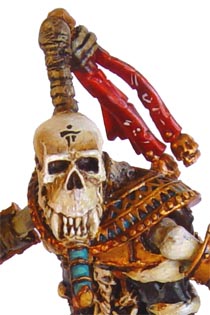
Take the Bone Giant head which has the skeletal head-dress on (least scary-looking head in the whole Warhammer World) and carefully cut off the chin-piece, making sure to take off a bit of the Bone Giant's chin as well to ensure a good fit. Drill a hole into the top of the skull of the other Bone Giant head (the bald one). Cut off a small piece of pinning wire and glue it in there. Then once its dry, use Green Stuff to sculpt topknot-bindings onto it.
Now take a file and file down the chin a little bit to make room for the chin-piece from the other head. Now glue it onto the body. Then, take about four of those rags from the banners of the Skeleton Regiment and glue them together, wrapping Green Stuff around a bit of it for strength and effect. Make sure they join together at the end with a skull in it (see picture). Poke a small hole into this skull and glue it onto the topknot bindings you made before. For extra strength, leave one of rags touching the Bone Giant's back and glue that down as well. Then glue on the chin-piece.
The very last thing to put on is the vulture. I originally intended to place it on the shoulder, but there ended up to be not enough room, so I had to place it on the Catapult arm. You can put it where you like, or just leave it off entirely. Now, on to painting.
Painting Sehenesmet:
I've used generic Tomb Kings colours for the most part, with the occasional black to make important features stand out (such as the chest). Be careful when painting not to snap off the chin-piece. For the base, I added a few skulls from the Skeleton Warriors regiment for decoration, and painted the sand about a 1000 shades of brown, drybrushed and blended up from Scorched Brown to Bleached Bone. As he is a Liche Giant, remember to add runes and mystical symbols all over him when painting. I've placed runes on his topknot, his forehead, his wand - there's even one on his right thigh-bone. This helps to emphasise the magical aspect of Sehenesmet.
Well, that's it. If you were inspired at all by this, or you have any questions or comments about this conversion, or my crazy quest to have an army made entirely of constructs led by Sehenesmet, please let me know by email at 30272519@student.murdoch.edu.au, or look for me on the Games Workshop forums under the user name Extelligence. If you would like to see the rules for Sehenesmet, check the Citadel Journal if you live in the UK or US, or in Australia email White Dwarf Oz and ask them to send you the address of the downloadable PDF. Thanks for reading this and putting up with my self-indulgent whims!